Tank Auth is an authentication library for PHP-framework CodeIgniter. It’s based on DX Auth, althouth the code was seriously reworked.
Tag: codeigniter
Smarty templating engine integration for CodeIgniter 3.0+
Smarty templating engine integration for Codeigniter 3.0+ with inbuilt theming and asset management.
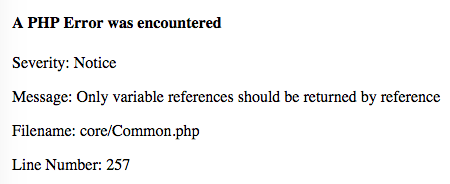
CI Notice: Only variable references should be returned by reference
วิธีติดตั้ง Smarty 3.1.7 กับ CodeIgniter 2.1.0
ผมหาทางติดตั้ง Smarty 3.1.7 เพื่อให้ใช้งานได้กับ CodeIgniter 2.1.0 ได้ โดยมีขั้นดังนี้
- ดาวน์โหลดและติดตั้ง CodeIgniter ตามปกติ
- การติดตั้ง Smarty จะดำเนินการโดยใช้ Ci-Smarty ที่พัฒนาขึ้นโดยคุณ Dwayne Charrington ให้ดาวน์โหลดและติดตั้งลงใน CodeIgniter ในข้อ 1. แล้วให้ทำการทดสอบว่าสามารถใช้งาน Smarty ได้จริง
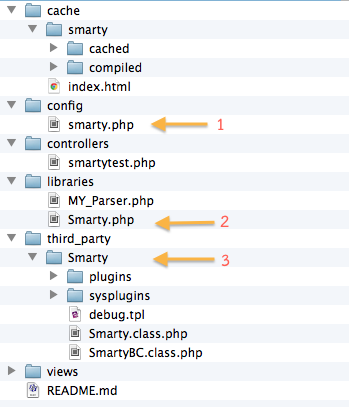
- เนื่องจากในขณะที่เขียนบทความนี้ Smarty ที่ิติดตั้งใน Ci-Smarty เป็นเวอร์ชัน 3.1.1 เราจึงต้องมีการแก้ไขปรับแก้ไฟล์ โดยโครงสร้างไฟล์ของ Ci-Smarty มีดังภาพข้างล่างนี้

- เราต้องปรับแก้ 3 ส่วน ตามที่ลูกศรชี้ไว้
- ส่วนที่ 1 แก้ไขไฟล์ smarty.php ในไดเรกทอรี config โดยให้แก้ตัวแปร $config[‘cache_status’] ให้มีค่าเป็น TRUE จากเดิมที่เป็น 1 เนื่องจากในไฟล์ libraries/Smarty.php ตรวจสอบค่า $config[‘cache_status’] ว่าเป็น TRUE หรือไม่
$config['cache_status'] = TRUE;
และให้เพิ่ม 2 บรรทัดต่อไปนี้ที่ท้ายไฟล์ เพื่อจะได้เป็นการบังคับให้ให้มีการ compile template ทุกครั้งในระหว่างที่เรากำลังพัฒนาโปรแกรม และเมื่อจะนำไปใช้งานจริงก็ควรกำหนดค่าให้เป็น FALSE ทั้ง 2 ตัวแปร
$config['compile_check'] = TRUE;
$config['force_compile'] = TRUE;
- ส่วนที่ 2 แก้ไขไฟล์ Smarty.net ในไดเรอกทอรี libraries โดยให้เพิ่ม 2 คำสั่งต่อไปนี้ใต้บรรทัดที่มี $this->template_ext เพื่อนำค่าจากการแก้ไขส่วนที่ 1 มาใช้งาน
$this->compile_check = config_item('compile_check');
$this->force_compile = config_item('force_compile');
หลังจากนั้นให้ทำการ comment ในคำสั่งส่วนที่จะทำการเพิ่ม helper ต่างๆ โดยใส่เครื่องหมาย /* และ */ ครอบเอาไว้ สาเหตุที่ต้อง comment ไว้ก็เพราะเมื่อเรา upgrade Smarty เป็น 3.1.7 แล้ว คำสั่งในส่วนนี้จะทำให้เกิด error (หากอยากทราบว่าเป็นอย่างไรก็ปล่อยไว้ได้)
/* // Add all helpers to plugins_dir $helpers = glob(APPPATH . 'helpers/', GLOB_ONLYDIR | GLOB_MARK); foreach ($helpers as $helper) { $this->plugins_dir[] = $helper; } */ - ส่วนที่ 3 ให้ทำการดาวน์โหลด Smarty 3.1.7 แล้วแตกไฟล์และคัดลอกเอาไฟล์และไดเรกทอรีภายใต้ libs มาทับของเดิมใน third_party/Smarty/ ทั้งหมด
ขอขอบคุณ คุณ Dwayne Charrington ที่ได้พัฒนา Ci-Smarty ไว้ครับ ขั้นตอนข้างบนนี้จะไม่จำเป็นเมื่อ Ci-Smarty มีการ update ครับ และผมไม่รับประกันความเสี่ยงที่เกิดขึ้น รวมทั้งปัญหาที่ตามมาใดๆ ทั้งสิ้นครับ!
Happy Coding Year! 😀
Object Relational Mapper (ORM)
Object-relational mapping (ORM, O/RM, and O/R mapping) in computer software is a programming technique for converting data between incompatible type systems in relational databases and object-oriented programming languages.
From: http://en.wikipedia.org/wiki/Object-relational_mapping
หากมีเวลาก็ทดลองใช้งาน ORM ต่างๆ ได้
CodeIgniter – Session Bug within object storage
ผมใช้ CodeIginter แล้วเจอ error เกี่ยวกับ session library แบบนี้
A PHP Error was encountered
Severity: 4096
Message: Object of class stdClass could not be converted to string
Filename: libraries/Session.php
Line Number: 715
ลองค้นดูในเน็ตแล้วพบว่าเป็นบั๊กของ session เกี่ยวกับ object storage วิธีการแก้ที่
http://codeigniter.com/forums/viewthread/95690/P0/
โดยให้แก้ไฟล์ system/libraries/Session.php ที่บรรทัด 683 และ 714 จาก
$data[$key] = str_replace('\', '{{slash}}', $val);
ให้่เป็น
if(!is_object($val)) $data[$key] = str_replace('{{slash}}', '\', $val);
Codeigniter ตอน pagination class
Codeiginer มี pagination class เพื่อช่วยในการจัดแบ่งข้อมูลที่จะนำแสดงบนเว็บ โดยผู้ใช้สามารถกำหนดได้ว่าในแต่ละหน้านั้น จะให้แสดงจำนวนข้อมูลจำนวนเท่าใด โดยจะมีการทำลิ้งก์ให้เลือกหน้าถัดไปหรือย้อนหลังให้อัตโนมัติ เช่น
ตัวอย่างการใช้งาน
$this->load->library('pagination');

$config['base_url'] = 'http://example.com/index.php/test/page/';
$config['total_rows'] = '200';
$config['per_page'] = '20';

$this->pagination->initialize($config);

echo $this->pagination->create_links();
องค์ประกอบเบื้องต้น
ตัวแปร $config จากตัวอย่างข้างต้น ใช้ในการกำหนดองค์ประกอบที่ต้องการ โดยสามารถสร้างไฟล์สำหรับเก็บตัวแปร $config ชื่อ pagination.php แยกไว้ต่างหาก แล้วบันทึกไฟล์ไว้ที่ config/pagination.php
- base_url เป็น URL ของ controller class และ function ของเพจที่เราต้องการแบ่งการแสดงผลเป็นหน้า ซึ่งจะต้องกำหนดค่าให้ถูกต้อง เพราะเวลาเปลี่ยนหน้านั้นจะมีการส่งค่าให้ function เพื่อนำไป query ข้อมูลจากฐานข้อมูล
- total_rows เป็นจำนวนข้อมูลทั้งหมดที่เราต้องการนำมาแบ่งการแสดงผลเป็นหน้า จากตัวอย่างข้างต้นเป็นการกำหนดข้อมูลให้มีค่าเป็น 200 แต่ในการใช้งานจริงนั้น จำนวนข้อมูลทั้งหมดจะเป็นจำนวน record ที่ได้มาจากการ query ข้อมูลจากฐานข้อมูล
- per_page เป็นการกำหนดจำนวนข้อมูลที่จะให้แสดงในแต่ละหน้า
- initialize() เป็นฟังก์ชันส่งตัวแปร $config ให้ pagination class เพื่อให้จัดองค์ประกอบอย่างที่เราต้องการ
- create_links() เป็นฟังก์ชันที่สร้างลิ้งก์เลือกหน้าให้เราโดยอัตโนมัติ
ในการใช้งานจริงนั้น ส่วนของ base_url เราสามารถใช้ฟังก์ชัน base_url() ของ URL helper มาช่วยได้ เช่น
$config['base_url'] = base_url().'/controller/function';
และสำหรับจำนวนข้อมูลทั้งหมดนั้น สามารถใช้ฟังก์ชัน count_all() ของ Active record class มาช่วยนับจำนวน record ทั้งหมดในตารางได้ เช่น
$config['total_rows'] = $this->db->count_all('table');
สำหรับในกรณีที่ต้องการจำนวน record ที่ได้จากคำสั่ง query สามารถใช้ฟังก์ชัน count_all_results() ของ Active record class หรือฟังก์ชัน num_rows() จาก Result helper class ช่วยหาข้อมูลได้
ตัวอย่างการใช้ pagination class ใน controller มีดังนี้
function showdata()
{
	// Pagination section
	$config['base_url'] =  base_url().'/controller/showdata';
	$config['total_rows'] = $this->db->count_all('data_table');
	$config['per_page'] = '10';

	$this->pagination->initialize($config);
	$pagination_link = $this->pagination->create_links();
        // Send pagination link to Smarty
	$this->cismarty->assign('pagination_link', $pagination_link);

	// Get data from my_model
	$data = $this->my_model->get_data( $config['per_page'], $this->uri->segment(3) );
	$this->cismarty->assign('data', $data);

	// Output to browser
	$this->cismarty->display('showdata.tpl');
}
จากตัวอย่างข้างต้น จะเห็นฟังก์ชัน get_data() ต้องการ 2 อาร์กิวเม้นต์คือ $config[‘per_page’] และ $this->uri->segment(3)
- $config[‘per_page’] ใช้สำหรับกำหนดจำนวนข้อมูลที่ต้องการให้แสดงในแต่ละหน้า ดังที่อธิบายไว้ข้างต้น ซึ่งจะถูกใช้เป็นค่าของ limit ในการ query ข้อมูล
- $this->uri->segment(3) เป็นการอ้างถึงค่าของ segment ที่ 3 ใน URL เช่น เลข 5 ใน URL ต่อไปนี้ http://www.domain.com/controller/showdata/5 เป็นค่าที่อยู่ใน segment ที่ 3 ซึ่งจะถูกใช้เป็นค่า offset ในการ query ข้อมูล
ตัวอย่างฟังก์ชัน get_data() ของ my_model มีดังนี้
function get_data($per_page, $offset)
{

	$this->db->from('data_table');
	$this->db->limit($per_page, $offset);
	$query = $this->db->get();
	$data = $query->result_array();

        // Other code here ...
}
เทียบได้กับการใช้คำสั่ง SELECT * FROM data_table LIMIT $per_page, $offset
($this->db->limit() เป็นฟังก์ชันของ Active record class)
อ้างอิง
- Pagination Class: http://codeigniter.com/user_guide/libraries/pagination.html
- http://godbit.com/article/pagination-with-code-igniter
ข้อมูลเพิ่มเติม
