วิธีการติดตั้ง git, gitosis บน CentOS 5

“Git is a free & open source, distributed version control system designed to handle everything from small to very large projects with speed and efficiency.” – http://git-scm.com

“Gitosis is a tool which provides access control and remote management for hosted Git repositories. It allows for fine-grained management of read and write access over SSH, without requiring that the users have local system accounts on the server.”  – https://wiki.archlinux.org/index.php/Gitosis

ในการติดตั้ง git และ gitosis บน CentOS 5 นี้จะใช้ package จาก EPEL(Extra Packages for Enterprise Linux) ดังนั้นจะต้องทำการติดตั้ง EPEL ก่อน  โดยดูวิธีการติดตั้งได้ที่นี่ http://fedoraproject.org/wiki/EPEL/FAQ#howtouse  เช่น

# su -c 'rpm -Uvh http://download.fedora.redhat.com/pub/epel/5/i386/epel-release-5-4.noarch.rpm'

หลังจากนั้นติดตั้ง git และ gitosis ด้วยคำสั่ง

# yum install git gitosis

gitosis จะสร้าง user ชื่อ gitosis ดังนี้

-sh-3.2$ finger gitosis
Login: gitosis        			Name: git repository hosting
Directory: /var/lib/gitosis         	Shell: /bin/sh
Never logged in.
No mail.
No Plan.

และจะสร้างไดเรกทอรีขึ้นมา 2 อันคือ gitosis และ repositories

gitosis จะควบคุมการเข้าถึง repositories  ต่างๆ ผ่านทาง repository  พิเศษที่ชื่อว่า gitosis-admin ซึ่งจะอยู่ที่  /var/lib/gitosis/repositories

ทั้งนี้การที่จะติดต่อไปยังเซิร์ฟเวอร์จากเครื่องของเราจะต้องทำผ่านทาง SSH  จึงจำเป็นต้องสร้าง public SSH key ที่เครื่องของเราเองก่อน ด้วยคำสั่งต่อไปนี้

$ ssh-keygen -t rsa

เมื่อได้ไฟล์ id_rsa.pub  ซึ่งจะอยู่ที่ $HOME/.ssh/ มาแล้ว ก็ให้คัดลอกไฟล์นี้ไปไว้ในเซิร์ฟเวอร์   จากนั้นให้ทำการเพิ่ม public SSH key ของเราเข้าไปใน gitosis ด้วยคำสั่ง

# su - gitosis
$ gitosis-init < /tmp/id_rsa.pub

จากนั้นที่เครื่องของเรา  ให้ใช้คำสั่งต่อไปนี้เพื่อ clone gitosis-admin มาไว้ที่เครื่องเรา

$ git clone gitosis@HOSTNAME.COM:gitosis-admin.git

เมื่อตรวจสอบดู gitosis-admin ที่ clone มาจะพบข้อมูลดังนี้

$ cd gitosis-admin/
$ ls -l
total 8
-rw-r--r--  1 wachira  staff  154 Dec  9 23:48 gitosis.conf
drwxr-xr-x  3 wachira  staff  102 Dec  9 23:48 keydir

ไฟล์ gitosis.conf จะใช้สำหรับในการควบคุมสิทธิ์การเข้าถึง repositories ต่างๆ ของผู้ใช้  โดยมีรูปแบบเช่น

$ cat gitosis.conf
[gitosis]

[group gitosis-admin]
writable = gitosis-admin
members = wachira@hostname 

[group myteam]
writable = citest
members = wachira@hostname someone

โดยเมื่อเราต้องการเพิ่มผู้ใช้งานก็จะต้องแก้ไขไฟล์นี้  พร้อมๆ กับต้องเพิ่ม public SSH key ของผู้ใช้ใหม่ไว้ในไดเรกทอรี keyring ด้วย

วิธีการสร้าง repository ใหม่  เช่น citest สามารถทำได้ดังนี้

$ mkdir citest
$ cd citest
$ git init
$ git remote add origin gitosis@HOSTNAME.COM:citest.git

หลังจากนั้นเมื่อเราทำการ commit ไฟล์ต่างๆ ที่เครื่องเราเรียบร้อยแล้วให้ใช้คำสั่ง

$ git push origin master:refs/heads/master

คำสั่งนี้จะทำให้เซิร์ฟเวอร์สร้าง citest repository ที่ /var/lib/gitosis/repositories

กรณีที่  SSH server ไม่ได้ใช้ port 22 ซึ่งเป็นพอร์ตมาตรฐาน  ให้ทำการแก้ไขไฟล์ ~/.ssh/config  โดยเพิ่มคำสั่งดังนี้

Host *hostname.com
     Port 1234

อ้างอิง:

  1. Howto: Install git, gitosis & gitweb on CentOS 5
  2. Hosting Git repositories, The Easy (and Secure) Way
  3. 4 ssh config tips for faster remote working


การกำหนดให้ MySQL ใช้ utf-8 เป็นค่า default

การกำหนดให้ MySQL ใช้ utf-8 เป็นค่า default สามารถทำได้โดยการแก้ไข /etc/my.cnf ดังนี้

[client]
default-character-set=utf8
[mysql]
default-character-set=utf8
[mysqld]
default-character-set = utf8
collation-server = utf8_unicode_ci
init-connect='SET NAMES utf8'
character-set-server = utf8

แก้ปัญหาข้อความเตือนเวลาเรียก php cli

หากเกิดข้อความเตือนเมื่อเรียกคำสั่ง php แบบ cli (Command line) เช่น

$ /usr/bin/php --help
PHP Warning:  PHP Startup: memcache: Unable to initialize module
 Module compiled with module API=20050922, debug=0, thread-safety=0
 PHP    compiled with module API=20060613, debug=0, thread-safety=0
 These options need to match
 in Unknown on line 0
...

สามารถแก้ปัญหาโดยการใช้ option -n  ซึ่งหมายถึง php จะไม่ไปอ่านค่าต่างๆ ในไฟล์ php.ini   ตัวอย่างการใช้งานเช่น

$ /usr/bin/php --help -n

Change your Network Card MAC Address on Ubuntu

เมื่อมีการเปลี่ยนเน็ตเวิร์คการ์ด แล้วไม่สามารถ start network service ได้จะต้องแก้ไขไฟล์ /etc/network/interfaces ด้วยคำสั่ง

# sudo vi /etc/network/interfaces

และให้เพิ่ม MAC address ของการ์ดเข้าไปดังตัวอย่างด้านล่างนี้

auto eth0
iface eth0 inet dhcp
       hwaddress ether 01:02:03:04:05:06

จากนั้นให้ restart network service

sudo /etc/init.d/networking restart

Google URL Shortener

Google เปิดให้บริการ URL Shortener ที่ http://goo.gl

เราสามารถสร้างลิ้งก์ได้ทันที่โดยพิมพ์ลิ้งก์ที่ต้องการย่อผ่านเว็บ  ถ้าหากใช้งาน Chrome อยู่แล้ว ก็สามารถติดตั้ง goo.gl URL Shortener ได้จาก http://goo.gl/41Jvi (ดู source ของ extension นี้ได้ที่นี่ http://goo.gl/4pkr3)

หากเราต้องการให้มีการเก็บประวัติลิ้งก์่ย่อไว้ด้วย  ก็สามารถได้โดยการล็อกอินโดยใช้ Gmail account โดยนอกจากประวัติลิ้งก็แล้ว เราสามารถดูสถิติการคลิกของลิ้งก์ย่อแต่ละอันได้ด้วย

นอกจากนี้หากใช้บริการ Google Apps อยู่แล้ว ก็สามารถสร้าง  URL Shortener ภายใต้ชื่อโดเมนของเราได้ด้วย  เช่น http://link.engr.tu.ac.th/history โดยสามารถติดตั้งได้จาก Google Apps Margetplace ที่ http://goo.gl/kEtso และสามารถดูข้อมูลเพิ่มเติมได้จาก http://goo.gl/jlDm5

[Varnish] วิธีบันทึก Client IP บนเครื่อง backend

เราสามารถทำการบันทึก Client IP ทีเครื่อง backend  แทนที่จะให้ปรากฎเป็น IP ของ varnish เช่น 127.0.0.1  สามารถทำได้โดยการ แก้ไขไฟล์ /etc/varnish/default.vcl

sub vcl_recv {
  # Add a unique header containing the client address
  remove req.http.X-Forwarded-For;
  set    req.http.X-Forwarded-For = client.ip;
  # [...]
}

และเพิ่มบรรทัดต่อไปนี้ในไฟล์ /etc/httpd/conf/httpd.conf

LogFormat "%{X-Forwarded-For}i %l %u %t "%r" %>s %b "%{Referer}i" "%{User-Agent}i"" varnishcombined

และใน VirtualHost directive ให้ใช้ CustomLog ดังตัวอย่างต่อไปนี้

<VirtualHost *:80>
  ServerName www.example.com
  # [...]
  CustomLog /var/log/apache2/www.example.com/access.log varnishcombined
  # [...]
</VirtualHost>

ที่มา: http://varnish-cache.org/wiki/FAQ#HowcanIlogtheclientIPaddressonthebackend

แชร์ไดเรกทอรีระหว่าง Linux กับ Mac OS X

ผมติดตั้ง CentOS linux 5.5 ใน parallels virtual machine แล้วหาทางส่งไฟล์ระหว่างกัน วิธีการหนึ่งที่สามารถทำได้คือผ่าน samba ซึ่งมีขั้นตอนดังนี้ครับ

  1. ติดตั้ง samba ใน linux ด้วยคำสั่ง
    #yum install samba
  2. แก้ไขไฟล์ /etc/samba/smb.conf ให้มีเนื้อหาในส่วนของ [homes] เป็น
    [homes]
    comment = Home Directories
    browseable = yes
    writeable = yes
    read only = yes
  3. สั่งให้ samba ทำงานด้วยคำสั่ง
    #/etc/init.d/smb start
  4. กำหนด password ให้ user  โดย user นั้นจะต้องมีจริงในระบบ (local user)
    # smbpasswd -a username
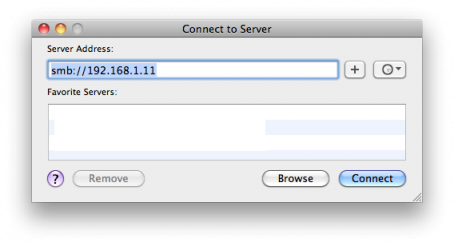
  5. ที่เครื่อง mac เปิด Finder เลือก Go และ Connect to Server
  6. ป้อน smb://หมายเลข ip ของ linux เช่น
    smb://192.168.1.11

@font-face

@font-face ใน CSS3 จะช่วยให้เราสามารถนำฟ้อนต์ที่เราต้องการไปใช้ในเว็บได้ อย่างไรก็ตามปัจจุบันบราวเซอร์แต่ละชนิดก็รองรับชนิดของฟ้อนต์แตกต่างกัน เช่น IE ต้องการเฉพาะ .eot (Embedded OpenType)  ในขณะที่ Safari, Firefox, Chrome และ Opera รองรับทั้ง .ttf  (TrueType Font ) และ .otf  (OpenType PS) โดยสามารถดูตาราง Browser Supprot for @font-face ได้ที่นี่

อย่างไรก็ตามวันที่ 8 เม.ย. 53 ที่ผ่านมา Microsoft, Mozilla และ Opera ได้ยื่นข้อเสนอมาตรฐานรูปแบบฟ้อนต์ที่ใช้บนเว็บ WOFF (Web Open Font Format) กับ  W3C    ซึ่งคงต้องรออีกพักหนึ่งกว่าที่จะกลายมาเป็นมาตรฐานที่ใช้กันได้ทั่วไป   ดังนั้นในเวลานี้เราก็คงต้องใช้รูปแบบฟ้อนต์ที่บราวเซอร์ในปัจจุบันใช้งานได้ไปก่อน

รูปแบบของการเขียน @font-face มีดังนี้

@font-face {
   font-family: AnyFontName; /* required */
   src: source; /* required */
   font-weight: weight; /* optional */
   font-style: style; /* optional */
}

ตัวอย่างรูปแบบการกำหนด source ของ font

@font-face {
   font-family: AnyFontName;
   src: url('../fonts/fontname1.eot');
   src: local('fontname2'),
   url('../fonts/fontname3') format('opentype'),
   url('../fonts/fontname4') format('svg');
}

จากตัวอย่างข้างต้น  เราสามารถตั้งชื่อ  font-family ได้ตามต้องการ  ซึ่งจะมีการเรียกใช้ชื่อฟ้อนต์ที่ตั้งไว้ดังนี้

h3 {
   font-family: AnyFontName, arial, helvetica, sans-serif;
}

ข้อความที่อยู่ระหว่าง <h3> และ </h3> ก็จะถูกแสดงด้วยฟ้อนที่ชื่อ AnyFontName    แต่เนื่องจาก browser รองรับฟอนต์ได้ไม่เหมือนกัน โดยเฉพาะ IE จึงมีผู้ทำการทำสอบว่าจะเขียน @font-face ในรูปแบบใดจึงจะเหมาะสมที่สุด

Useful links:

http://snook.ca/archives/html_and_css/becoming-a-font-embedding-master
http://xmlgraphics.apache.org/batik/tools/font-converter.html
http://www.fontsquirrel.com/fontface/generator
http://code.google.com/p/ttf2eot/
http://webfonts.info/wiki/index.php?title=@font-face_browser_support

MySQL: ย้ายข้อมูลระหว่างฐานข้อมูล

วิธีการง่ายๆ ในการย้ายข้อมูลระหว่าง  database สามารถทำได้ดังนี้

  1. สร้างฐานข้อมูลใหม่ เช่น  new_database
  2. ใช้คำสั่ง mysqldump ดังนี้
    #mysqldump -uroot -p old_database | mysql -uroot -p -D new_database