http://tutorialzine.com/2013/02/24-cool-php-libraries-you-should-know-about/
Author: Wp
The Yearly Round-up: 2013’s Best ExpressionEngine, WordPress, and Magento Content
“In 2013, you might have heard that eCommerce is getting more important. You might also have heard that web design is getting more important. But don’t forget blogging, because that is definitely getting more important. It’s hard to keep up, right? That’s why we like to gather up our favorite ExpressionEngine, WordPress, and Magento articles each month for your convenience. In honor of the New Year arriving, this month we’ve collected some of the best articles we’ve read all year. If you’d like more great content in 2014, follow us on Twitter,Facebook, and Google+. Enjoy and let us know what you think in the comment section!”
List of Minimalist Framework
https://github.com/neiesc/ListOfMinimalistFrameworks
Downloading an Entire Web Site with wget
If you ever need to download an entire Web site, perhaps for off-line viewing, wget can do the
job—for example:
$ wget \
     --recursive \
     --no-clobber \
     --page-requisites \
     --html-extension \
     --convert-links \
     --restrict-file-names=windows \
     --domains website.org \
     --no-parent \
     www.website.org/tutorials/html/
This command downloads the Web site www.website.org/tutorials/html/.
The options are:
- –recursive: download the entire Web site.
- –domains website.org: don’t follow links outside website.org.
- –no-parent: don’t follow links outside the directory tutorials/html/.
- –page-requisites: get all the elements that compose the page (images, CSS and so on).
- –html-extension: save files with the .html extension.
- –convert-links: convert links so that they work locally, off-line.
- –restrict-file-names=windows: modify filenames so that they will work in Windows as well.
- –no-clobber: don’t overwrite any existing files (used in case the download is interrupted and
resumed).Source: http://www.linuxjournal.com/content/downloading-entire-web-site-wget
วิธีการติดตั้ง PHP 5.4 ให้กับ Mac OS X Lion
สามารถดูได้จากที่นี่ http://php-osx.liip.ch/
ติดตั้ง brew ได้จาก http://mxcl.github.com/homebrew/
และสามารถอ่านวิธีการอื่นๆ เพิ่มเติมได้ที่นี่ http://jason.pureconcepts.net/2012/10/install-apache-php-mysql-mac-os-x/
วิธีติดตั้ง Smarty 3.1.7 กับ CodeIgniter 2.1.0
ผมหาทางติดตั้ง Smarty 3.1.7 เพื่อให้ใช้งานได้กับ CodeIgniter 2.1.0 ได้ โดยมีขั้นดังนี้
- ดาวน์โหลดและติดตั้ง CodeIgniter ตามปกติ
- การติดตั้ง Smarty จะดำเนินการโดยใช้ Ci-Smarty ที่พัฒนาขึ้นโดยคุณ Dwayne Charrington ให้ดาวน์โหลดและติดตั้งลงใน CodeIgniter ในข้อ 1. แล้วให้ทำการทดสอบว่าสามารถใช้งาน Smarty ได้จริง
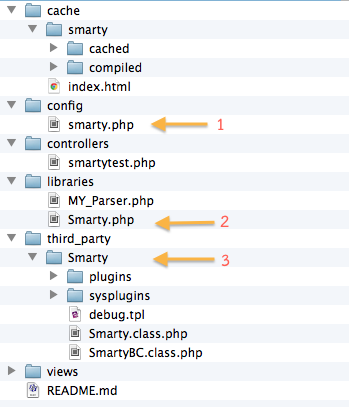
- เนื่องจากในขณะที่เขียนบทความนี้ Smarty ที่ิติดตั้งใน Ci-Smarty เป็นเวอร์ชัน 3.1.1 เราจึงต้องมีการแก้ไขปรับแก้ไฟล์ โดยโครงสร้างไฟล์ของ Ci-Smarty มีดังภาพข้างล่างนี้

- เราต้องปรับแก้ 3 ส่วน ตามที่ลูกศรชี้ไว้
- ส่วนที่ 1 แก้ไขไฟล์ smarty.php ในไดเรกทอรี config โดยให้แก้ตัวแปร $config[‘cache_status’] ให้มีค่าเป็น TRUE จากเดิมที่เป็น 1 เนื่องจากในไฟล์ libraries/Smarty.php ตรวจสอบค่า $config[‘cache_status’] ว่าเป็น TRUE หรือไม่
$config['cache_status'] = TRUE;
และให้เพิ่ม 2 บรรทัดต่อไปนี้ที่ท้ายไฟล์ เพื่อจะได้เป็นการบังคับให้ให้มีการ compile template ทุกครั้งในระหว่างที่เรากำลังพัฒนาโปรแกรม และเมื่อจะนำไปใช้งานจริงก็ควรกำหนดค่าให้เป็น FALSE ทั้ง 2 ตัวแปร
$config['compile_check'] = TRUE;
$config['force_compile'] = TRUE;
- ส่วนที่ 2 แก้ไขไฟล์ Smarty.net ในไดเรอกทอรี libraries โดยให้เพิ่ม 2 คำสั่งต่อไปนี้ใต้บรรทัดที่มี $this->template_ext เพื่อนำค่าจากการแก้ไขส่วนที่ 1 มาใช้งาน
$this->compile_check = config_item('compile_check');
$this->force_compile = config_item('force_compile');
หลังจากนั้นให้ทำการ comment ในคำสั่งส่วนที่จะทำการเพิ่ม helper ต่างๆ โดยใส่เครื่องหมาย /* และ */ ครอบเอาไว้ สาเหตุที่ต้อง comment ไว้ก็เพราะเมื่อเรา upgrade Smarty เป็น 3.1.7 แล้ว คำสั่งในส่วนนี้จะทำให้เกิด error (หากอยากทราบว่าเป็นอย่างไรก็ปล่อยไว้ได้)
/* // Add all helpers to plugins_dir $helpers = glob(APPPATH . 'helpers/', GLOB_ONLYDIR | GLOB_MARK); foreach ($helpers as $helper) { $this->plugins_dir[] = $helper; } */ - ส่วนที่ 3 ให้ทำการดาวน์โหลด Smarty 3.1.7 แล้วแตกไฟล์และคัดลอกเอาไฟล์และไดเรกทอรีภายใต้ libs มาทับของเดิมใน third_party/Smarty/ ทั้งหมด
ขอขอบคุณ คุณ Dwayne Charrington ที่ได้พัฒนา Ci-Smarty ไว้ครับ ขั้นตอนข้างบนนี้จะไม่จำเป็นเมื่อ Ci-Smarty มีการ update ครับ และผมไม่รับประกันความเสี่ยงที่เกิดขึ้น รวมทั้งปัญหาที่ตามมาใดๆ ทั้งสิ้นครับ!
Happy Coding Year! 😀
วิธีทำให้ mod_rewrite ทำงานบน Mac OS X Lion
หากใช้งาน Apache ที่มากับ Mac OS X แล้วเกิดปัญหา mod_rewrite ไม่ทำงาน ให้แก้ไขที่ไฟล์ /etc/apache2/users/username.conf (แทนที่ username ด้วย username จริงๆ ที่ใช้งานในระบบ) ให้แก้ไข ที่ AllowOverride None ให้เป็น AllowOverride All ดังตัวอย่างข้างล่าง
<Directory "/Users/username/Sites/">
     Options Indexes MultiViews
     AllowOverride All
     Order allow,deny
     Allow from All
</Directory>
อีกวิธีการหนึ่งสามารถดูได้ที่นี่ http://akrabat.com/php/setting-up-php-mysql-on-os-x-10-7-lion/
เปลี่ยนชื่อ blog ใน wordpress
ผมเปลี่ยนชื่อจาก http://www.diary.in.th/my เป็น http://my.diary.in.th
ขั้นตอนการดำเนินการก็ไม่ยาก เพราะอยู่ใน account เดียวกันแค่สร้าง subdomain เพิ่ม และก็อปปี้ข้อมูลจากไดเรกทอรีเดิมไปที่ใหม่
WordPress ก็ได้ทำเว็บไซต์เกี่ยวกับเรื่องนี้ไว้ด้วย สามารถทำตามได้เลย
หลังจากย้ายข้อมูลเสร็จก็ใช้ Apache mod rewrite จัดการให้ลิ้งก์เดิมถูกส่งต่อไปลิ้งใหม่ เช่น http://www.diary.in.th/archives/572 จะถูกส่งต่อไปที่ http://my.diary.in.th/archives/572 โดยอัตโนมัติ
ผมเขียนคำสั่งต่อไปนี้ในไฟล์ .htaccess
RewriteEngine On
Redirect 301 /my http://my.diary.in.th
Redirect 301 /archives http://my.diary.in.th/archives
วิธีการติดตั้ง git, gitosis บน CentOS 5
“Git is a free & open source, distributed version control system designed to handle everything from small to very large projects with speed and efficiency.” – http://git-scm.com
“Gitosis is a tool which provides access control and remote management for hosted Git repositories. It allows for fine-grained management of read and write access over SSH, without requiring that the users have local system accounts on the server.” – https://wiki.archlinux.org/index.php/Gitosis
ในการติดตั้ง git และ gitosis บน CentOS 5 นี้จะใช้ package จาก EPEL(Extra Packages for Enterprise Linux) ดังนั้นจะต้องทำการติดตั้ง EPEL ก่อน โดยดูวิธีการติดตั้งได้ที่นี่ http://fedoraproject.org/wiki/EPEL/FAQ#howtouse เช่น
# su -c 'rpm -Uvh http://download.fedora.redhat.com/pub/epel/5/i386/epel-release-5-4.noarch.rpm'
หลังจากนั้นติดตั้ง git และ gitosis ด้วยคำสั่ง
# yum install git gitosis
gitosis จะสร้าง user ชื่อ gitosis ดังนี้
-sh-3.2$ finger gitosis
Login: gitosis        			Name: git repository hosting
Directory: /var/lib/gitosis         	Shell: /bin/sh
Never logged in.
No mail.
No Plan.
และจะสร้างไดเรกทอรีขึ้นมา 2 อันคือ gitosis และ repositories
gitosis จะควบคุมการเข้าถึง repositories ต่างๆ ผ่านทาง repository พิเศษที่ชื่อว่า gitosis-admin ซึ่งจะอยู่ที่ /var/lib/gitosis/repositories
ทั้งนี้การที่จะติดต่อไปยังเซิร์ฟเวอร์จากเครื่องของเราจะต้องทำผ่านทาง SSH จึงจำเป็นต้องสร้าง public SSH key ที่เครื่องของเราเองก่อน ด้วยคำสั่งต่อไปนี้
$ ssh-keygen -t rsa
เมื่อได้ไฟล์ id_rsa.pub ซึ่งจะอยู่ที่ $HOME/.ssh/ มาแล้ว ก็ให้คัดลอกไฟล์นี้ไปไว้ในเซิร์ฟเวอร์ จากนั้นให้ทำการเพิ่ม public SSH key ของเราเข้าไปใน gitosis ด้วยคำสั่ง
# su - gitosis
$ gitosis-init < /tmp/id_rsa.pub
จากนั้นที่เครื่องของเรา ให้ใช้คำสั่งต่อไปนี้เพื่อ clone gitosis-admin มาไว้ที่เครื่องเรา
$ git clone gitosis@HOSTNAME.COM:gitosis-admin.git
เมื่อตรวจสอบดู gitosis-admin ที่ clone มาจะพบข้อมูลดังนี้
$ cd gitosis-admin/
$ ls -l
total 8
-rw-r--r--  1 wachira  staff  154 Dec  9 23:48 gitosis.conf
drwxr-xr-x  3 wachira  staff  102 Dec  9 23:48 keydir
ไฟล์ gitosis.conf จะใช้สำหรับในการควบคุมสิทธิ์การเข้าถึง repositories ต่างๆ ของผู้ใช้ โดยมีรูปแบบเช่น
$ cat gitosis.conf
[gitosis]

[group gitosis-admin]
writable = gitosis-admin
members = wachira@hostname

[group myteam]
writable = citest
members = wachira@hostname someone
โดยเมื่อเราต้องการเพิ่มผู้ใช้งานก็จะต้องแก้ไขไฟล์นี้ พร้อมๆ กับต้องเพิ่ม public SSH key ของผู้ใช้ใหม่ไว้ในไดเรกทอรี keyring ด้วย
วิธีการสร้าง repository ใหม่ เช่น citest สามารถทำได้ดังนี้
$ mkdir citest
$ cd citest
$ git init
$ git remote add origin gitosis@HOSTNAME.COM:citest.git
หลังจากนั้นเมื่อเราทำการ commit ไฟล์ต่างๆ ที่เครื่องเราเรียบร้อยแล้วให้ใช้คำสั่ง
$ git push origin master:refs/heads/master
คำสั่งนี้จะทำให้เซิร์ฟเวอร์สร้าง citest repository ที่ /var/lib/gitosis/repositories
กรณีที่ SSH server ไม่ได้ใช้ port 22 ซึ่งเป็นพอร์ตมาตรฐาน ให้ทำการแก้ไขไฟล์ ~/.ssh/config โดยเพิ่มคำสั่งดังนี้
Host *hostname.com
     Port 1234
อ้างอิง:
- Howto: Install git, gitosis & gitweb on CentOS 5
- Hosting Git repositories, The Easy (and Secure) Way
- 4 ssh config tips for faster remote working
การกำหนดให้ MySQL ใช้ utf-8 เป็นค่า default
การกำหนดให้ MySQL ใช้ utf-8 เป็นค่า default สามารถทำได้โดยการแก้ไข /etc/my.cnf ดังนี้
[client]
default-character-set=utf8
[mysql]
default-character-set=utf8
[mysqld]
default-character-set = utf8
collation-server = utf8_unicode_ci
init-connect='SET NAMES utf8'
character-set-server = utf8